Jakarta, Indonesia
Posts

Reading My Prepaid Electricity Meter with an $8 Camera (and No Machine Learning)

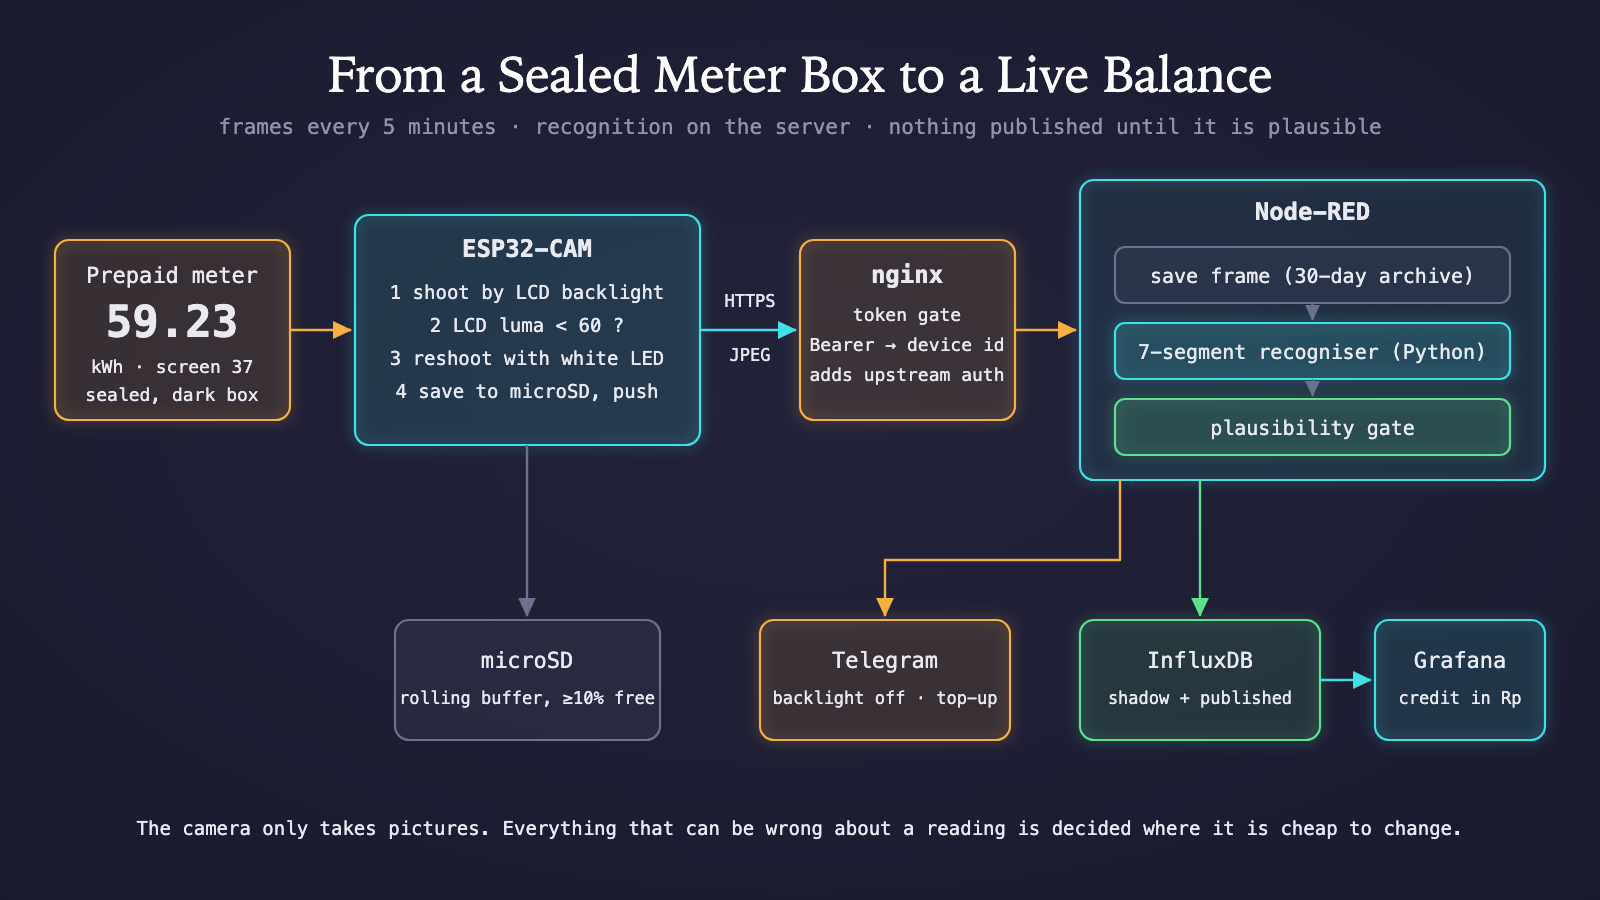
My house runs solar-first, and the utility grid is only the backup. I wrote about that in the idle grid post. What I didn't mention there is that the backup is prepaid. You buy a token from PLN, type it into the meter's keypad, and the meter counts your credit down in kWh until it reaches zero. That remaining-credit figure is the one number in my energy setup I couldn't get into InfluxDB. It lives on an LCD, on a meter, inside a sealed metal box behind a clear cover. I already log how much power the grid breaker draws, so I can estimate what's been used. But an estimate needs a starting point, and the only source for that is the display itself. So I pointed a camera at it. The project is called GridTokenReader: an ESP32-CAM, which costs about US$8, that photographs the LCD and reports the remaining kWh. One thing up front: this isn't finished. The device captures and pushes frames reliably, and the recogniser reads my reference frames correctly, but it is still running in shadow mode and publishes nothing yet. This post covers how it got that far, and why I'm not trusting it yet.
GridTokenReader architecture: ESP32-CAM, nginx token gate, Node-RED recogniser and plausibility gate, InfluxDB and Grafana
The meter is a Smart Meter Indonesia SMI-810 V2. Its LCD has a blue backlight and shows the balance with two decimals, for example 59.23. A small two-digit field in the top-right corner says which screen is showing (37 is the balance screen). Like every segmented LCD, the unlit segments are still faintly visible as "ghosts". The install made four things awkward:
Constraint
Consequence
Only 3–4 cm between lens and LCDThe frame is about 5 cm wide. I centre it on the value and the screen code. Anything up to 999.99 kWh fits; the leftmost digit positions don't.
Sealed metal box, no ambient lightThe camera has to bring its own light, or use the meter's.
Glossy clear coverThe on-board LED reflects straight back into the lens.
Stock lens focused at about 1 mThe OV2640 is fixed-focus. Sharp digits this close means breaking the glue dab and rotating the lens.
There are no photos of the real meter in this post, and that's deliberate. The meter number printed on the front identifies the customer account, so everything here is a diagram. My first assumption was that the white LED on the ESP32-CAM would be the light source, and that this was good news: a sealed box means lighting that never changes. It took three rounds to get there:
  1. On/off flash was too much. At this distance full power blows the LCD out. The LED became PWM-driven, with a settle time (600 ms by default) so auto-exposure can converge from darkness, plus an optional fixed exposure and gain. All of it is adjustable from sliders in the device's web UI and saved on the device.
  2. 5 kHz PWM put stripes on the image. The rolling shutter picked up the LED flicker as banding. Moving the PWM to 40 kHz fixed it. The LED also sits on its own LEDC channel, because the camera clock owns channel 0.
  3. The best light wasn't mine at all. The meter's own backlight gives a cleaner image than the LED ever does, because it produces no reflection on the cover.
That third point changed the design. The default light mode is now auto: shoot without the LED first, check whether the LCD is actually lit, and only fall back to the LED if it isn't.
Cpp
// firmware/src/camera.cpp (abridged)
camera_fb_t *cameraCaptureAuto(CaptureInfo &info) {
  // No LED first: shoot by the meter's backlight, then measure the LCD region.
  camera_fb_t *fb = cameraCapture(0);
  info.lcdLuma = cameraRegionLuma(fb);
  if (settings.lightMode == LIGHT_BACKLIGHT || !fb || settings.ledDuty == 0 ||
      info.lcdLuma < 0 || info.lcdLuma >= settings.backlightMinLuma) {
    return fb;
  }
  // Backlight is off (e.g. after a blackout): light the LCD ourselves.
  esp_camera_fb_return(fb);
  info.usedLed = true;
  return cameraCapture(settings.ledDuty);
}
The brightness check decodes the JPEG at 1/8 scale and averages the central region where the LCD sits. A backlit SMI-810 measures around 108; the dark box measures 15–30. The threshold is 60, so there is plenty of room on both sides. The fallback is needed because of one quirk of this meter: after a power cut, the backlight stays off until someone presses a key. Every upload carries an X-Capture header saying which light was used and what the LCD brightness was. When Node-RED sees the source flip to led, it sends one Telegram message asking me to press a key on the meter, and another when the backlight is back. None of this is interesting until it's missing. A device that lives inside a sealed box has to be maintainable without opening the box.
Problem
What the firmware does
Brownout resets from LED + Wi-Fi TX peaksStarts Wi-Fi 1.5 s before the camera and caps TX power at 15 dBm. On a laptop USB port it still browns out once on the first boot after a USB flash; a proper 5 V supply fixes that.
USB flashing corrupts dataThe CH340 on the programmer board fails at 460800 baud and above, so upload speed is 230400.
Reflashing means opening the boxOTA from the first day: over Wi-Fi from PlatformIO, or a browser upload at /update. Both need a password, and the uploader rejects anything that isn't an app image.
The network or the backend is downEvery capture also goes to a microSD rolling buffer in dated folders. The oldest files are deleted to keep at least 10% free.
SD and LED want the same pin4-bit SD mode uses GPIO 4, which drives the LED. The card runs in 1-bit mode.
Cards that acknowledge writes and discard themOn mount, the firmware writes a probe file and requires it to show up in a real directory listing. A card that fails is refused.
The ingest side has one rule: the device never holds my Node-RED password. Each device gets its own bearer token. nginx checks it, stamps the device ID that belongs to that token, and adds the upstream credentials itself. A leaked token can be revoked on its own, and a device can't claim to be a different device. When I wrote the roadmap, I listed a small CNN digit classifier as the "most likely winner" for recognition. That is what AI-on-the-edge-device does, and it proves the approach works on this hardware. But I tried the cheap option first, and so far it hasn't needed replacing. The camera is fixed and the LCD is fixed, so every digit sits at the same pixels in every frame. Finding the digits is already solved. What's left is checking seven known spots per digit and asking whether each one is lit.
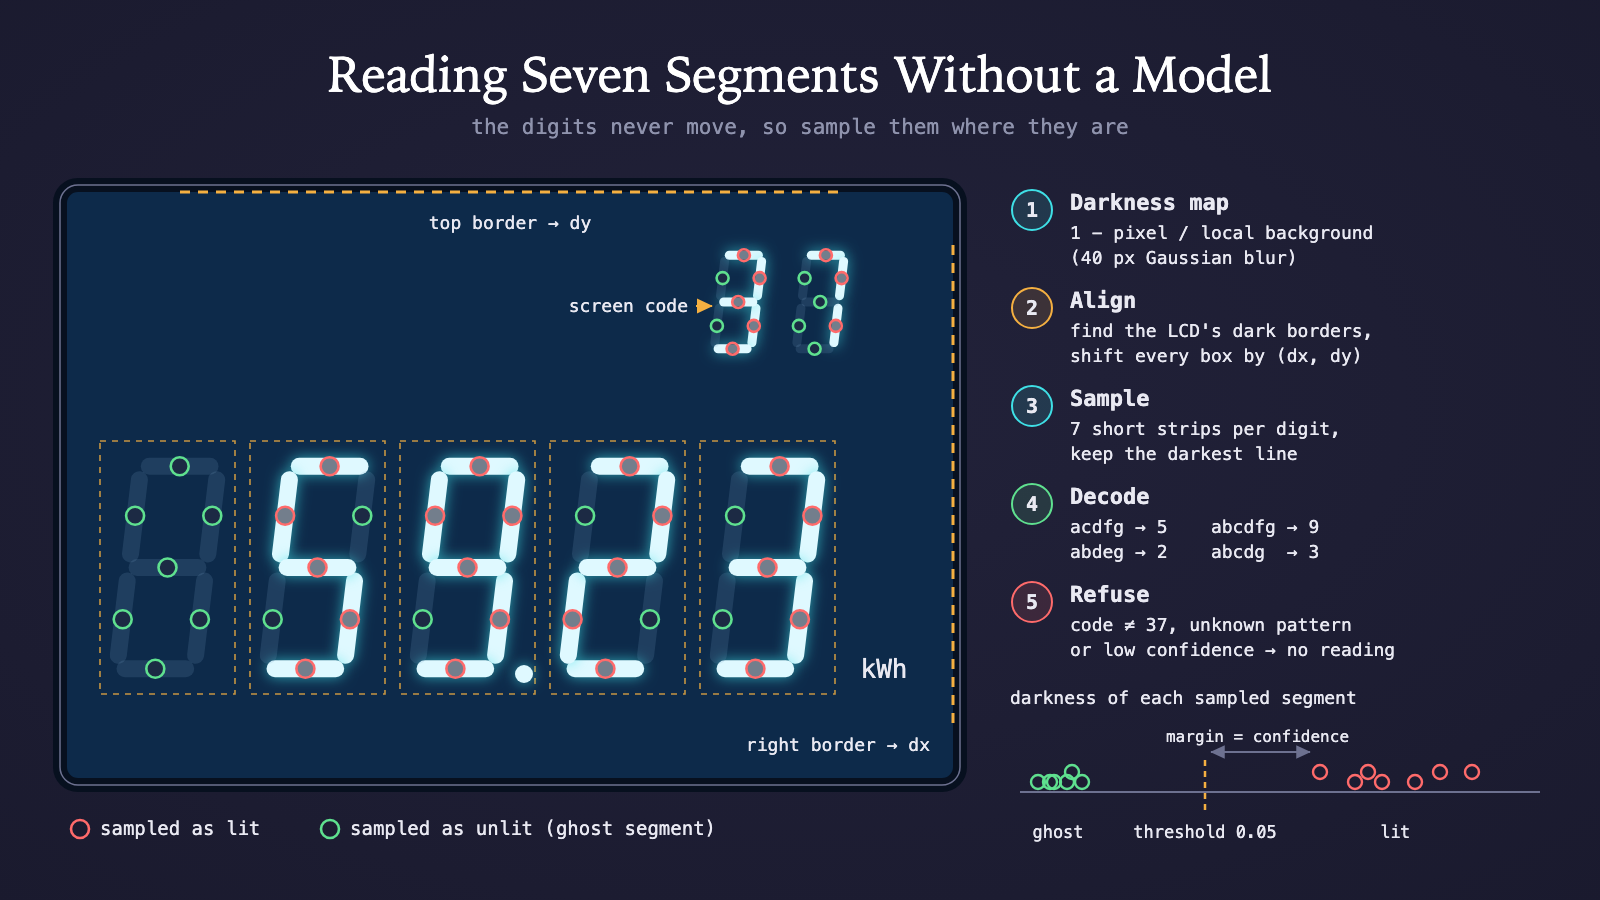
Seven-segment sampling: calibrated digit boxes, sample points on each segment, alignment to the LCD borders, and the threshold between ghost and lit segments
(The diagram follows this blog's dark style, so the lit segments glow. On the real LCD it's the other way round: lit segments are the dark ones, on a bright blue background.) The recogniser is about 200 lines of Python using Pillow and numpy. It works in five steps. 1. Build a darkness map. A fixed brightness threshold breaks as soon as the exposure shifts. So each pixel is compared with its own neighbourhood instead:
Python
def darkness_map(img):
    """0 = like the local background, 1 = much darker (a lit LCD segment)."""
    gray = img.convert("L")
    bg = gray.filter(ImageFilter.GaussianBlur(40))
    g = np.asarray(gray, dtype=np.float32)
    b = np.asarray(bg, dtype=np.float32) + 1.0
    return np.clip(1.0 - g / b, 0.0, 1.0)
Lit segments score high. Ghost segments score close to zero, whatever the exposure was. 2. Align. A bumped camera shouldn't break everything. The LCD window has dark borders, so the code finds the right and top edges and shifts all the calibrated boxes by the difference. 3. Sample each segment. Each segment is read as a short strip along its direction, and the darkest line within a few pixels across is the one that counts. That absorbs small misalignments. The SMI-810's digits are italic, so the sample points lean with a slant factor. 4. Decode. The set of lit segments maps to a digit: acdfg is 5, abcdfg is 9. Leading blanks are allowed. A pattern that isn't a digit becomes ?, and the reading fails. 5. Refuse when unsure. The screen code must read 37, otherwise the frame is showing some other screen and is ignored. And the confidence is set by the least convincing segment: how far it is from the threshold. Below the minimum, there is no reading. A good frame produces this:
{"ok": true, "kwh": 59.23, "code": "37", "confidence": 1.0, "digits": " 5923", ...}
Calibration is one JSON file per installation, holding the digit box positions, pitch, slant and border anchors. A --debug flag writes an overlay that circles every sample point, red for lit and green for unlit, which makes tuning a matter of looking at one picture. It reads 59.23 and code 37 on all of my reference frames. That's a narrower result than it sounds: those frames are all backlit and all show the same value. It hasn't been tested on an LED-lit frame with glare, or across enough different digits. One of the principles in the roadmap is that a doubtful reading must be reported as unknown, never as a plausible-looking wrong number. A wrong balance in a time series is worse than a gap, because everything downstream will trust it. Seven-segment misreads are also nasty in a specific way. One mis-sampled segment turns a 5 into a 6, and 59.23 becomes 69.23: a perfectly valid number that happens to be wrong. A prepaid balance has rules that a general-purpose OCR result doesn't. It falls, slowly, and it only jumps up when someone enters a token. The gate in Node-RED enforces exactly that:
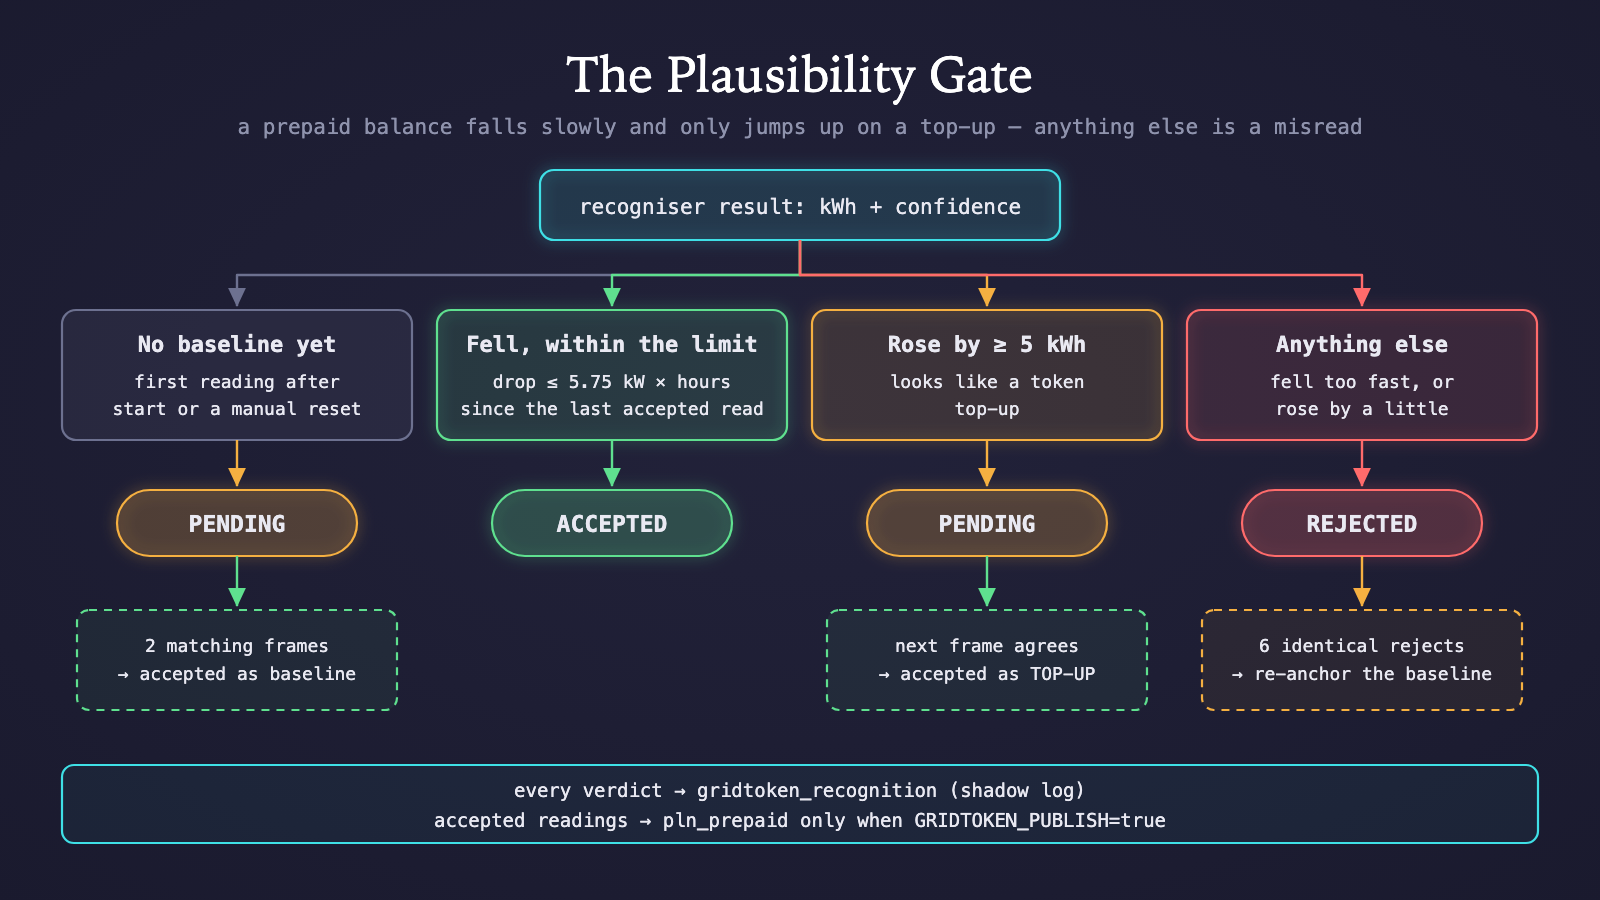
Plausibility gate: baseline needs two matching frames, drops are bounded by the supply limit, rises are only accepted as confirmed top-ups, everything else is rejected
Reading
Rule
Verdict
First one after a start or resetNeeds a second frame showing the same valuePending, then accepted as baseline
Lower than the last acceptedDrop must be within 5.75 kW × elapsed time (a 25 A breaker at 230 V)Accepted
Higher by 5 kWh or moreLooks like a top-up; the next frame must agreePending, then accepted as top-up
Anything elseFell faster than the breaker allows, or rose by a littleRejected
Same rejected value 6 times in a rowThe baseline is probably the wrong oneRe-anchored
The core of it is short:
Javascript
// node-red: plausibility function (abridged)
const hours = Math.max(0, (now - st.last.ts) / 3.6e6);
const drop = st.last.kwh - k;
if (drop >= -0.005 && drop <= maxKw * hours + 0.02) {
    accept(null);
} else if (-drop >= topupMin) {
    if (st.pending && same(st.pending.kwh, k)) {
        topup = +(k - st.last.kwh).toFixed(2);
        accept('topup');
    } else hold('top-up: waiting for a confirming frame');
} else {
    verdict = 'rejected';
    // ...6 identical rejected reads re-anchor the baseline
}
With a frame every five minutes, the supply limit allows a drop of about 0.48 kWh between two frames. Anything larger is rejected. The re-anchor rule exists because a gate like this can lock itself out. If the baseline is the wrong value, every correct reading after it looks implausible. Six identical rejects, about half an hour, is taken as evidence that the meter really does say that. Posting a hand-read value resets the baseline too. The gate isn't airtight. A misread that repeats on the next frame, say from a reflection that stays put, could still pass as a top-up. That is the reason for shadow mode: every recogniser result and every verdict is logged to its own measurement, and nothing reaches the real pln_prepaid series until I set GRIDTOKEN_PUBLISH=true. A reading every five minutes is still a step function. Grafana fills in the gaps with data I already had. The panel takes the last meter reading, subtracts the grid energy drawn since then, and multiplies by the tariff:
credit (Rp) = (last reading in kWh − ∫ grid power since that reading) × 1,785.7 Rp/kWh
The camera supplies the anchor and the power series supplies everything in between. Each new accepted reading replaces the anchor, so the integral never has long to drift. The same endpoint accepts a hand-read value under a manual token, so the panel works before the camera is trusted.
Phase
Status
0 — Capture, lighting, push, OTA, SD bufferDone
2 — Recognition in the backendRunning in shadow mode
NextEvaluate one to two days of frames, including an LED-lit one after a backlight-off event, then turn publishing on
Exit criteria for Phase 2Two weeks of readings at 99%+ accuracy (or explicitly unknown) and zero false top-ups
3 — Recognition on the deviceNot started
4 — Browser flasher, phone setup, Home Assistant discoveryNot started
If the segment sampler falls over on glare, the CNN is still on the list. The plausibility gate and the shadow log stay either way, since they don't care what produced the number. The photo is the hard part. Distance, focus, PWM frequency and which light to use all had to be right before recognition was worth attempting. Once the image was clean, recognition was the short bit. Constrain before you train. I expected to need a model. A fixed camera looking at a fixed display is a much smaller problem than "read digits", and the small version didn't need training data. Give the reader the right to say "unknown". The screen code check, the confidence floor and the plausibility gate all do the same job: turn a wrong answer into no answer. Use what you know about the number. "It only falls, no faster than the breaker allows" is a stronger check than anything in the image. Shadow mode before trust. Logging verdicts next to the real series costs nothing and tells me exactly when it's safe to switch. The code is MIT-licensed at github.com/afardana/GridTokenReader. If you have a different prepaid meter, photos of its display (with the meter number covered) are the most useful contribution.
Part of my ongoing home IoT series. See also: why my grid breaker stays off by default and the three-tier hysteresis engine that decides when the grid is allowed back on.
On this page